Good and long posts have a table of contents. This improves the readability, usability and SEO ranking for your Ghost publications.
But adding them can be cumbersome: it takes a while and when you update your headings your table of contents often is broken. Not an optimal process if you just want to focus on your writing.
Fear no more! In this tutorial, we will build a snippet that automatically creates a table of contents based on the headings of your Ghost post.
Table of Contents
- What Table of Contents we will be building
- Step 1: Build a snippet as ToC placeholder
- Step 2: Use Ghost code injection for your table of contents
- Step 3: Test and customize your Ghost ToC
- Other designs for your Ghost ToC
- ToC as simple list in Ghost
- Theory behind it: understanding the code
- Celebrate and maybe say thank you?
ℹ️ Free hosting for your Ghost site
This link will get you a $200 credit at Digital Ocean. You can host your Ghost website there for free. I will receive credit from Digital Ocean if you eventually become a paying customer. This is not sponsored. I recommend it because I happy with the service of Digital Ocean.
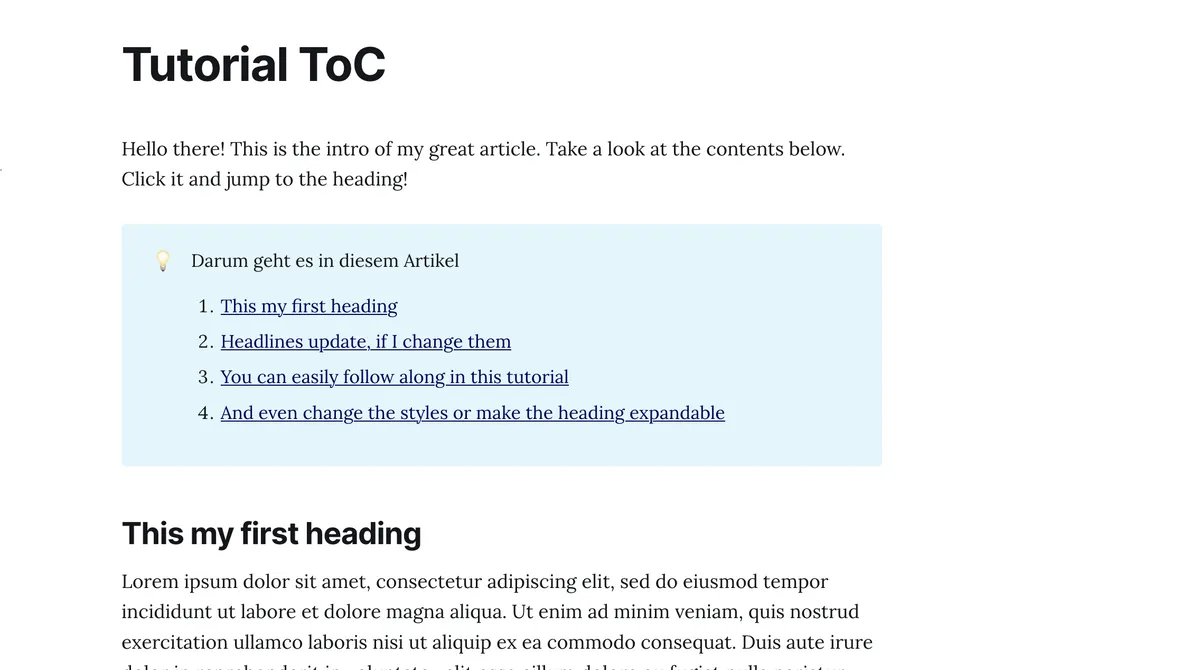
What Table of Contents we will be building
We will build a snippet, that you can insert anywhere in your Ghost post. It will take your headings and creates a table of contents of those. Each heading will be linked so that readers can quickly jump to the part of the post.
Note: below you can choose some other designs as well. I’ll also explain how you can make your own customized table of contents for your Ghost posts. 🎨🧑🎨
So basically we create a list of all headings of your Ghost post. You will be able to choose which headings to include (only H2 headings, H2 and H3 or all the way down to H6). I would recommend to not include any heading smaller than H3 (sorry, H4 to H6 😬), but that is up to you!
You can also change which headings to include in your ToC in each Ghost post.
Great, but now let’s build this thing!
Step 1: Build a snippet as ToC placeholder
Go to any of your Ghost posts and create an HTML snippet. To do so, click the + icon and select HTML insert a raw HTML card.
Now we will build placeholder. This is where your table of contents will be inserted automatically automagically later on, based on the headings of your post.
Copy and paste the below code in your HTML snippet.
<div id="post-table-of-contents" max-depth="h2"></div>
Great. Now create a reusable snippet by clicking outside the HTML card and using the “create snippet” function of Ghost. Name it whatever you want, maybe toc maybe table-of-contents or my-magic-toc-that-helps-me-a-lot 😜
Perfect. So far you do not see much. This snippet does not really do anything visible - yet. That’ll change in the next step.
Step 2: Use Ghost code injection for your table of contents
We need to copy and paste some code as code injection to make our ToC placeholder from step 1 work.
If you want to use the table of contents (snippet) everywhere across your Ghost site, you should inject it in the “global” code injection.
To inject the code for your table of contents:
- Go to your Ghost panel and click
Settings - Scroll down to advanced features and click
Code Injection - In your Site Footer, inject the snippet below
- Then hit save
If you want to use your table of contents only on one specific site, you can inject the code in each post. To do that, go to your Ghost post. Open the post settings (where you set the URL and tags) and click on code injection at the bottom.
Code snippet for your table of contents in Ghost:
<!-- Table of Contents -->

<script>
const tocContainer = document.getElementById("post-table-of-contents")
var tableOfContents = ""

if (tocContainer) {
    const maxDepth = tocContainer.getAttribute("max-depth")
    var headingNodes;

    switch(maxDepth) {
        case "h2":
            headingNodes = ".gh-content h2"
            break;
        case "h3":
            headingNodes = ".gh-content h2, .gh-content h3"
            break;
        case "h4":
            headingNodes = ".gh-content h2, .gh-content h3, .gh-content h4"
            break;
        case "h5":
            headingNodes = ".gh-content h2, .gh-content h3, .gh-content h4, .gh-content h5"
            break;
        case "h6":
            headingNodes = ".gh-content h2, .gh-content h3, .gh-content h4, .gh-content h5, .gh-content h6"
            break;
        default:
            headingNodes = ".gh-content h2"
            break;
    }
    const headings = document.querySelectorAll(headingNodes)
    headings.forEach((link) => {
        const id = link.getAttribute("id")
        const text = link.textContent
        tableOfContents += `
            <li class="post-toc-list__item post-toc-list__item--${link.nodeName.toLowerCase()}">
                <a href="#${id}" class="post-toc-list__link">${text}</a>
            </li>
        `
        }
    )

    tocContainer.classList.add("post-toc")
    tocContainer.innerHTML = `
        <div class="kg-card kg-callout-card kg-callout-card-blue">
            <div class="kg-callout-emoji">💡</div>
            <div class="kg-callout-text">Table of Contents<br>
                <ol>
                    ${tableOfContents}
                </ol>
            </div>
        </div>
    `

}
</script>
Step 3: Test and customize your Ghost ToC
Now you can check the preview of the post. You should see your table of contents exactly where you placed the placeholder in step 1. If not, check any typos and if you pasted the correct code snippets.
Customize your Table of Contents
- Include more headings: For now, your ToC only includes
H2headings. If you want to include alsoH3(or even further below) you can change thetoc-snippetwe created in step 1:<div id="post-table-of-contents" max-depth="h2"></div>Notice themax-depth="h2"? If you change that toh3allh2andh3headings are included. - Change the headline and icon: Although I find it quite literally a great idea to have the 💡 and Table of Contents as header, you are of course free to change it. Head to the code injection and change it right in the code. Search for
kg-callout-emojiand change the 💡 or forkg-callout-textand change the text. There are more designs below! - Change the color of your ToC: Not so much into blue? No worries, you can switch the color. Note: you can only choose colors that are available for the Ghost
calloutsnippet. To change them change thekg-callout-card-blueto a color available for callouts. Or maybe your brand color by replacing it withkg-callout-card-accent. There are more designs below! - Place the ToC somewhere else: By moving the
toc-snippetfrom step 1 to another place in your Ghost post, the actual table of contents will also be changed. You can place it in the middle of the article or even add a second one!
Other designs for your Ghost ToC
If the Ghost Callout Card is not your type of style, I have some more for you.
Ghost expandable and collapsible table of contents
If you want your ToC to be hidden and only shows the links and articles if readers click on it, you just need to change the injected code snippet. Repeat step 2 but paste this code snippet:
<!-- Table of Contents -->

<script>
const tocContainer = document.getElementById("post-table-of-contents")
var tableOfContents = ""

if (tocContainer) {
    const maxDepth = tocContainer.getAttribute("max-depth")
    var headingNodes;

    switch(maxDepth) {
        case "h2":
            headingNodes = ".gh-content h2"
            break;
        case "h3":
            headingNodes = ".gh-content h2, .gh-content h3"
            break;
        case "h4":
            headingNodes = ".gh-content h2, .gh-content h3, .gh-content h4"
            break;
        case "h5":
            headingNodes = ".gh-content h2, .gh-content h3, .gh-content h4, .gh-content h5"
            break;
        case "h6":
            headingNodes = ".gh-content h2, .gh-content h3, .gh-content h4, .gh-content h5, .gh-content h6"
            break;
        default:
            headingNodes = ".gh-content h2"
            break;
    }
    const headings = document.querySelectorAll(headingNodes)
    headings.forEach((link) => {
        const id = link.getAttribute("id")
        const text = link.textContent
        tableOfContents += `
            <li class="post-toc-list__item post-toc-list__item--${link.nodeName.toLowerCase()}">
                <a href="#${id}" class="post-toc-list__link">${text}</a>
            </li>
        `
        }
    )

    tocContainer.classList.add("post-toc")
    tocContainer.innerHTML = `
        <div class="kg-card kg-toggle-card" data-kg-toggle-state="close">
            <div class="kg-toggle-heading">
                <h4 class="kg-toggle-heading-text">Table of Contents</h4>
                <button class="kg-toggle-card-icon"><svg id="Regular" xmlns="http://www.w3.org/2000/svg" viewBox="0 0 24 24"><path class="cls-1" d="M23.25,7.311,12.53,18.03a.749.749,0,0,1-1.06,0L.75,7.311"></path></svg></button>
            </div>
            <div class="kg-toggle-content">
                <ol>
                        ${tableOfContents}
            </ol>
            </div>
        </div>`
}
</script>
ToC as simple list in Ghost
Maybe you just want to keep it simple? In that case, just create a list as table of contents. Do you want it numbered? Then replace everything of the below the tocContainer.innerHTML =
.
.
.
tocContainer.innerHTML = `
            <ol>
                        ${tableOfContents}
        </ol>`
  }
</script>
Or if you prefer bullet points, change the two ol (that stands for ordered list) to ul (unordered list).
Ghost Table of Contents that scrolls down next to your text
This requires some more code. I will cover this later. Subscribe to my YouTube Channel, if you do not want to miss it. In the meantime, this tutorial from Ghost might be helpful for you.
Theory behind it: understanding the code
How does your newly added table of contents work under the hood? It does look more complicated than it is. Let’s go through the code step by step.
Firs of all, we add the script at the Ghost footer. The script is executed and replaces every ToC-placeholder on the page. Furthermore, it searches all headings (depending on the max-depth only h2 or also smaller headings) of the content part (those that are within the class .gh—content) of your Ghost post.
These heading nodes contain the title of the heading as well as the id. The id is needed because we want to create the table of contents with links that jump to the respective heading. Therefore, we iterate over all headings and create a list item (<li>) that is a link to the id and the link has the text of the heading.
Finally, we replace the content (innerHTML) of our placeholder (called tocContainer) with the actual ToC. Depending on your style that is some sort of (<div class="xyz"...) and the most important thing: your table of contents (${tableOfContents}).
Celebrate and maybe say thank you?
Great. Big Ghost Party 👻🎉
I hope this article helped you to save some time and create a beautiful table of contents for your Ghost website!
I had a difficult time figuring this out. I honestly hope I could save you some hours time of fixing this. If this was helpful to you, I would really appreciate a coffee or small donation via PayPal.